Now a days document security is becoming the basic need of every organization which restricts the user of one business unit from viewing another unit’s data. As we have seen in our last blog “Document Security for Sage 300”,in this blog, we will see the configuration and working of Document Security Module.
• Document Security Setup // User Authorization : :{ Document Security –> User Authorization }
At the User Authorization screen, the Admin can set a combination of Account Set, Bank Code, Location, Item and Tax group to every user so that the user will only have an access of particular vendors and customers who is having Account Set, Bank Code, Location, Item, Tax group as per configuration done in the user authorization screen.
Before Giving rights to Particular User, Admin has to create User by following below given two steps:-
1. Create User from Administrative services
2. Specify Security Group to each Module and assign rights to user at User Authorization screen at Administrative services
There are Two types of User we can create in this module,
1. Corporate User: who has all the rights of all the Modules same as per Admin.
2. Non corporate User: Who has a specific rights given by admin using Document security module.
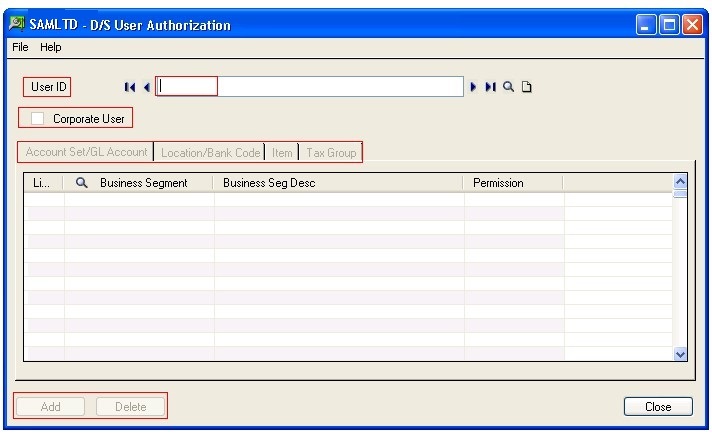
Here as shown in image, the Admin has to create User names ( E.g. ABC) at administrative Services and then activate Document Security module . Then after Open User Authorisation Screen and specify the combination of digits of Account Set, Bank Code, Location, Item, Tax group which “ABC” user can access or use . Providing the rights of the particular masters are done by setting up permission whether it is Grant or Deny action against each Account set, location. Item, tax group. Corporate User checkbox is meant for giving admin rights to the user.
New Stuff : Migrate A/P Payment Terms from Quickbooks to Sage 300 ERP
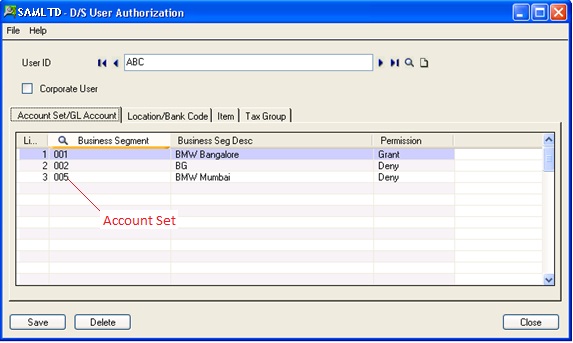
Account set / GL Account: In this tab, the admin can assign single or Multiple Business unit which are the digits of account set, for Eg. Vendor “V00001” having an account set “CE0011”, so the admin has to assign “001” Business Unit to ABC user. When User is doing Transaction at multiple module and they want to selects Account set that time system can only display list of Account Set which having Business Unit “ 001”, “002”,“005”. For e.g. “CE001”, ‘”DW0051” etc.
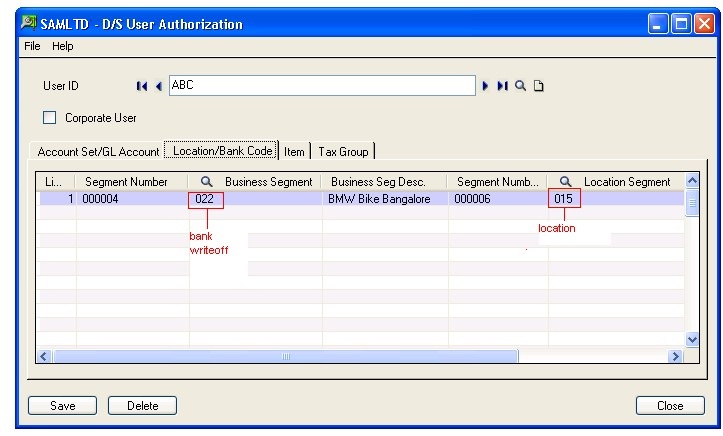
Location / Bank code: In this tab admin can assign single or Multiple Business segment which are the digits of Bank Write Off and also assign the Single or Multiple Location Segment which are digits of Integration of IC Location to user, for E.g. Vendor “V00001” having a Bank “AEKNK001” which having write off “022”, so admin Assign “022” Business segment to ABC user as bank code and assign Location Segment as “015”. When User is doing Transaction at multiple module and they want to select location from Finder that time system can only display list of Location which having integration of “015”. For e.g. “I0009“”, ‘”I0005” etc.
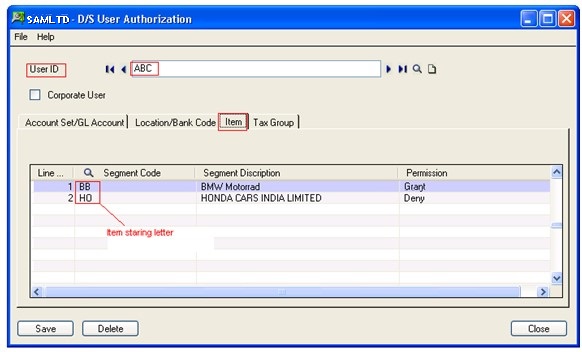
Item : In this tab admin can allow single or Multiple segment Code which are the starting letters of Item code, admin Assign different type of item code like “BB”, “ HO” Item Segment code to ABC User .. When User is doing Transaction at multiple module and they want to select Item that time system can only display list of Item which having Segment code “ BB”, “HO”. For e.g. “BB00001”, “HO00001” etc.
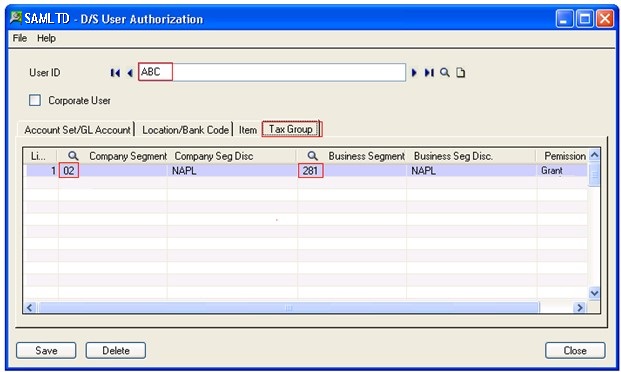
Tax Group: In this tab admin can assign single or Multiple Company segment and Business Segment which are the digits of Tax group, for Eg. Vendor “ V00001” having a Tax Group Of “022811P001” , so admin Assign Company Segment “02” Business Segment “281” to ABC user.. When User is doing Transaction at multiple module and if vendor is having Tax Group Other than “02281” series or other than “NOTAXGRP” system will give an error message of Tax Group to user so user can change tax group from finder and that time system can only display list of which having Tax Group having code “02281” for e.g. “022811P001 “022811P002” “022811P004” etc.
“NOTAXGRP” Is default tax group which all vendor and Customer can have. So any user can do the transaction for all the vendors and all customers by changing its NOTAXGRP to assigned Tax group successfully.
Also Read:
1.Creating Purchase Order By Using Sales Order details in Sage 300.
2.Terms Code feature in Account Payable in Sage 300 ERP
3.AR Customers-OE Sales Inquiry
4.Business Security in Sage 300
Sage 300 ERP – Tips, Tricks and Components
Explore the world of Sage 300 with our insightful blogs, expert tips, and the latest updates. We’ll empower you to leverage Sage 300 to its fullest potential. As your one-stop partner, Greytrix delivers exceptional solutions and integrations for Sage 300. Our blogs extend our support to businesses, covering the latest insights and trends. Dive in and transform your Sage 300 experience with us!

