Quality Control is a process of observing, verifying and maintaining a desired level of quality in an existing product or service by proper planning, using multiple equipment/instruments , continued inspection, and corrective action as required. For example, QC inspectors measure and weight products, examine samples and test them and take action if quality is not ok accordingly , Quality control inspectors work in a wide range of industries, including food and drink, pharmaceuticals and electronics.
New Stuff: Introduction: Quality Control Module in SAGE 300 ERP
For Doing QC of any item we have to do the setup using the multiple setup screens available At QC setup which will further used in transnational screens, follow the brief introduction…
Q/C Setup
Option : {QC Module >QC setup >Option >Company/Numbering }
QC Option Screen is having Two Tabs,
- Company
- Numbering
In the Company Tab user can see the Company profile as per below screenshot, which was set by the user/ company at common services. (Contains Company Name, Address, City, State, Pin code, Country)
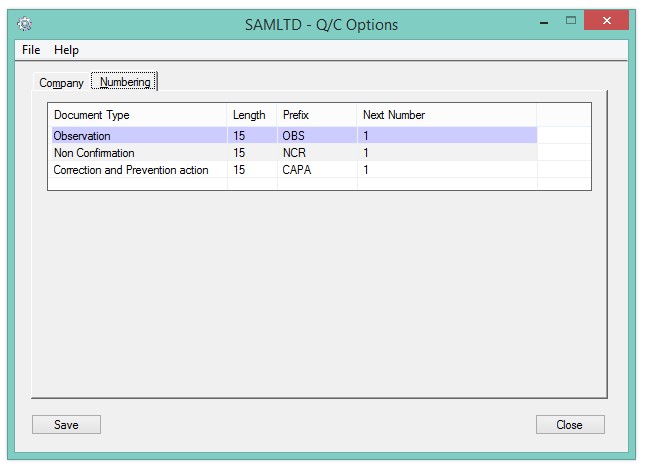 In Numbering Tab User can set the information Related to QC Document as per requirement, it is having three main Transactions,
- Observation / Inspection
- Non Confirmation Receipt
- Corrective And Preventive Action
In this Tab, User can Set Prefix, Length, Next Number to these three transnational entries manually, As per below screenshot at beginning it will be set by the system automatically.
Quality Assurance Plan
{QC Module > QC setup > Quality Assurance Plan}
The given Screen is developed to maintain multiple Quality Assurance plans used to monitor and control the level of quality.
Here User or company can save multiple plans by adding the information like QAP code, Description Remark, It would be unique for each Plan. Please refer below Screenshot of the same.
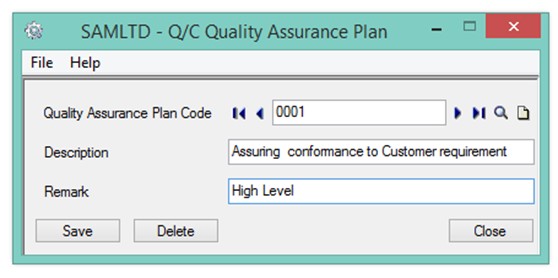 As Shown in Image, User can enter QAP code “0001”at text box, also user can enter description “Assuring conformance to Requirement” and remark “High Level” as per their requirement at given Text field.
QAP code and Description are mandatory fields, which we will further used in Observation Entry.
Quality Instrument Master
{QC Module > QC setup > Quality Instrument Master}
This Screen is used to maintain Information about the Instruments/ equipment’s used in Quality control process, There are number of instrument used in this module, so we can add and Save the information of each of Instrument by giving unique Instrument Code , Description and Remark at given text fields,
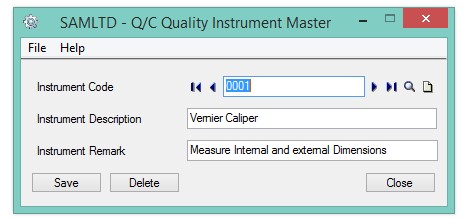 As Shown in Image, for e.g. If the product is Cell Phone so the quality Parameter will be the Color, Shape, Size, weight, Appearances etc. User can enter Parameter code, Description as per their requirement at the given Text field.
Parameter code and Description are mandatory fields, which we will further used in Item Mapping screen.
Quality Item Master
{ Q/C Module > Q/C setup > Quality Item Master}
This Screen is used to maintain the Information (specification/ superscript specification) about the each of the Item used in the Module, Here we have to Mapped Multiple of Item need to test in QC by inspectors/observer, so we can add the specification as per parameter against each item available for QC,
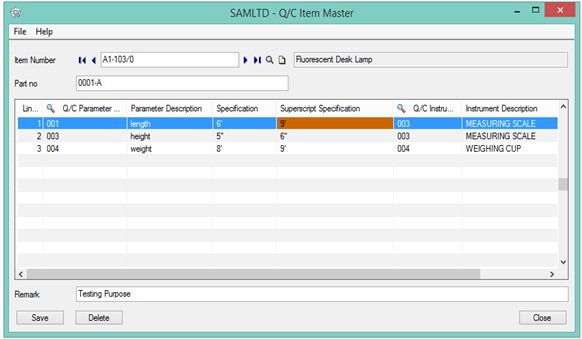 or e.g. If the Item Number “A1-103/0” it’s description is “ Fluorescent Desk lamp ”
- Select the Item From Finder.
- Enter its Part Number “FDL003”
- Enter its Part Description “Size Issue”
Now at detail grid we have to use Quality Parameter, Instruments which we have added in Quality parameter, Instrument screen. - Enter or select Quality Parameter “ 0003”//“ Height”
- Enter Specification 4.5’ , Superscript specification 5.5’
- Enter or Select Instrument “ 0001”// “ Measuring Scale”
As Shown in Image, for Mapping we can add Multiple of Q/c parameter and related Instruments to single Item.
Item mapping is necessary because system allows user to use only Mapped items at (Observation entry) transaction screen.
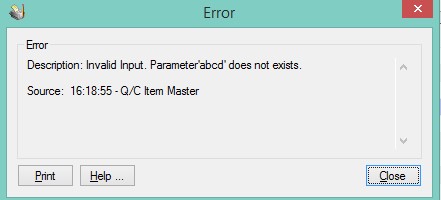
If User enters wrong or Invalid Quality parameter or Instrument code, system will give an error message and left the field blank.
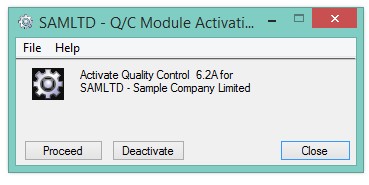
 Q/C Module Activation
{QC Module > QC setup > Q/C Module Activation}
Using this screen User can activate and deactivate the Q/C Module, by using Proceed and deactivate Button. At the beginning, User have to do the module activation process before moving towards the transaction and setup screens.
About Us
Greytrix a globally recognized Premier Sage Gold Development Partner is a one-stop solution provider for Sage ERP and Sage CRM needs. Being recognized and rewarded for multi-man years of experience, we bring complete end-to-end assistance for your technical consultations, product customizations, data migration, system integrations, third party add-on development and implementation expertise.
Greytrix offers unique GUMU™ integrated solutions of Sage 300 with Sage CRM, Salesforce.com and Magento eCommerce along with Sage 300 Migration from Sage 50 US, Sage 50 CA, Sage PRO, QuickBooks, Sage Business Vision and Sage Business Works. We also offer best-in-class Sage 300 customization and development services and integration service for applications such as POS | WMS | Payroll | Shipping System | Business Intelligence | eCommerce for Sage 300 ERP and in Sage 300c development services we offer services such as upgrades of older codes and screens to new web screens, newer integrations using sdata and web services to Sage business partners, end users and Sage PSG worldwide. Greytrix offers over 20+ Sage 300 productivity-enhancing utilities that we can help you with such as GreyMatrix, Document Attachment, Document Numbering, Auto-Bank Reconciliation, Purchase Approval System, Three way PO matching, Bill of Lading and VAT for Middle East.
For more details on Sage 300 and 300c Services, please contact us at accpac@greytrix.com. We will be glad to assist you.

