Sage 300 ERP provides solution to maintain the sales and purchase of goods as per user requirements.
In our previous blog Taxes in Sage 300 ERP we had discussed about tax configuration, going further, in this blog we will discuss about Tax classes in detail.
Tax classes are used to define multiple tax classes for sales item, purchase item, customer and vendor.
Go to Common Services >> Tax Services >> Tax Classes
New Stuff: DBSPY in Sage 300 ERP
Tax class screen allows users to do following:
• User can define tax classes for tax authorities defined in tax Authority screen based on below entities.
1. Transaction type
2. Class Type
Transaction Type: There are two transaction types:
a. Sales – To define tax classes of tax authority for sales
b. Purchase – To define tax classes of tax authority for purchase.
Class type: There are two types of classes for each transaction type:
a. Item – to define item level tax classes separately for sales and purchase.
b. Vendor/customer – To define vendor/customer level tax classes.
• User can modify or delete tax classes.
• User can define up to 10 tax classes for each class type.
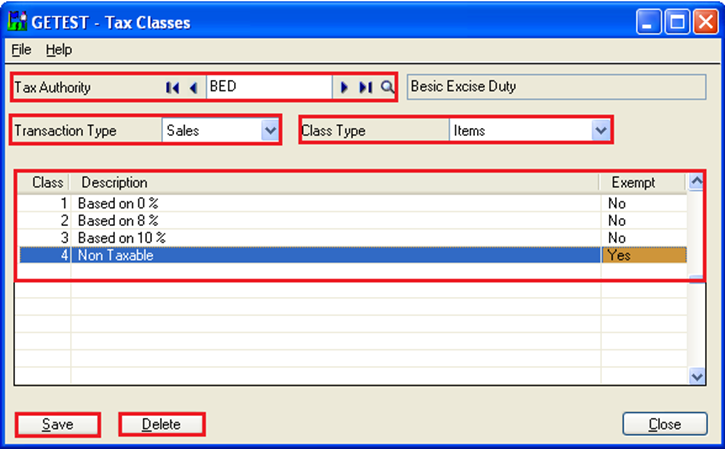
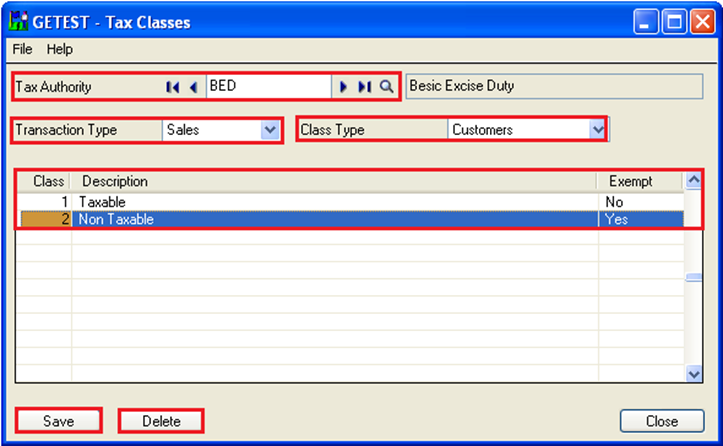
Please refer below screen shots for Tax classes.


To create tax classes follow the below process:
1. Select tax authority.
2. Select transaction type.
3. Select class type as item.
4. Add classes on grid
5. Save tax classes.
6. Change class type as Customer
7. Add tax classes in grid.
8. Save tax classes.
Note: If the user has to define tax classes for sales then at least one class in both item as well as customer class type needs to be defined.
This feature of sage 300 ERP help to define multiple tax rates for single tax authority. This will help to reduce time and stress of user.
In our next blog we will discuss about how to define tax rates for tax class.
Also Read:
1. Taxes in Sage 300 ERP
2. Tax Setting – Allow Tax In Price
3. Setting up Price Inclusive of Taxes in Sage 300 ERP
4. Tax Calculation on the basis of Quantity in Sage 300 ERP
5. Tax Tracking Report in Sage 300 ERP
