Recently I encountered a situation wherein I had to fetch records of Views and display the same, but from a database other than the CRM default database. It took some time to think about the way to accomplish my requirement and then after some researching I came up with the solution.
The solution to tackle it was by creating the Database in CRM and attaching the required view of the database along with filling the necessary information. Below are the steps to do the same.
To Establish Database Connection:
- Goto Administration -> Advanced Customization -> Tables and Databases.
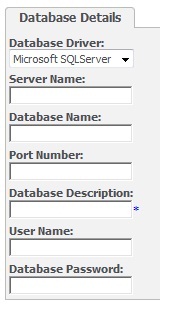
- Click on New Database Connection button located at the extreme right of the screen. After clicking the button below screen will open up.

Following info needs should be provided in the Database Details screen.
Database Driver: Select your database driver from the drop down available.
Server Name: You need to provide your Server IP address.
Database Name: You need to provide the name of the Database which we need to access.
Port Number: The Port number of the database.
Database Description: The caption name of the database which will be reflected in CRM. This filed is mandatory.
User Name: User Name of the database.
Database Password: Password required to login database.
Once we are done with filling the above information click on the Save Button.
Our next task is to attach desired view. Below are the steps to achieve the same.
To attach the views:
- Goto Administration -> Advanced Customization -> Tables and Databases
- Click on the New Table Connection button located at the extreme right of the screen. After clicking below screen will open up.

Following info needs to be filled in Table Details screen.
Table name: The name of the desired view. This filed is mandatory.
Table Caption: The Caption of the table which will be reflected in Sage CRM. This filed is mandatory.
Database: The database name, to which the view is attached.
ID Field Name: The primary key field name present in the view.
Once done with filling the above info click on the Save button.
Now smile folks you are done in achieving your task in very easy way.
