Sage X3 provides us a Quality Control module that is used to carry out the quality control and confirm the Product availability to place inventory into the stock.
Once the product received in the receipt from the Supplier then the creation of Receipt entry and according to configuration process product must pass through quality control for quality verification purpose and accordingly stock identified by status. (Refer below identification code for product status)
“A“ that indicates acceptance status for the product
“Q“ indicates pending validation status for the product
“R“ indicates the Rejection status for the product
In this blog, we will discuss about Rejection label generation process for those products which got rejected from the Quality control module.
Let’s understand the process with a single example.
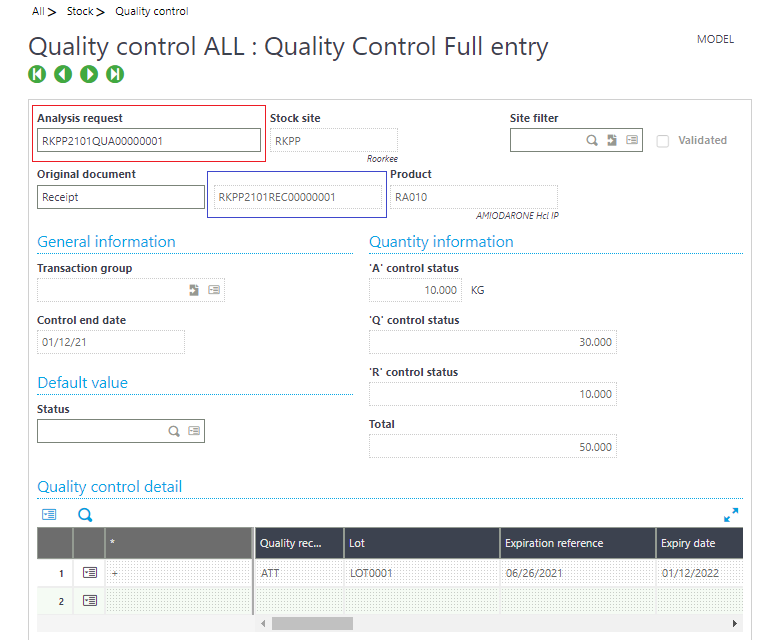
According to setup once the user creates a Receipt entry from the PO then the Analysis request gets created automatically. (Refer below screenshot for more Clarification)

If you can see above the Quality control screen, the Analysis request was successfully created based on the Purchase Receipt entry also we have highlighted the same Receipt number with blue Border and the Analysis request with Red Border.
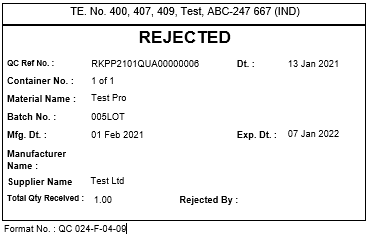
Now as per the current client current requirement the Rejection label will be print-based on the Qty present from Detail level, in case there will be 10 Qty present then 10 label will be print respectively for each Product.
Below is the Rejection Label format as per requirement:

Here is some Fields mapping that we have used in the Rejection label.
1. REJECTED: Hardcoded Text
2. QC Ref No: Analysis Request No. from Quality Control screen
3. Dt: Control end date from Quality Control
4. Material Name: All –Stock—Quality Control –Product Disc
5. Batch No. : All –Stock—Quality Control –Quality control Detail-Lot
The purpose of this blog that users can print label-wise Products along with required details and easily keep tracking of rejected Inventories.

