In the competitive world of sales, having up-to-date sales data is crucial for sales representatives. Equally important is maintaining strict control over which accounts each rep can access. Sage X3 provides a straightforward solution to manage user access while ensuring that reps can still handle transactions related to their assigned accounts. This article delves into the step-by-step process of configuring a sales rep profile and linking it to a specific X3 user ID, offering a comprehensive guide to streamline user management within the system.
Creating a Sales Rep ID involves the following steps:
1. Navigate to the “Common data” section.
2. Select “BPs” (Business Partners), then choose “Sales Rep.”
3. Click on the “New” button to create a new Sales Rep entry.
4. Enter a unique Sales Rep ID along with other pertinent information such as name, contact details, and any additional relevant data.
5. Once all required information is entered, click on the “Create” button to finalize the creation of the Sales Rep ID.
This process ensures that a new Sales Representative is properly registered within the system, allowing for effective management and tracking of sales-related activities.

Assign Row Level Permissions:
Assigning Row Level Permissions involves configuring settings to control which data rows users can access based on predefined rules and values. By setting up Row Level Permissions, users are restricted to viewing only the data that corresponds to their assigned criteria. For example, if a user is assigned to a specific sales representative, they will only be able to see customers, quotes, orders, deliveries, and invoices associated with that sales rep. This ensures that users have access to relevant data while maintaining data security and privacy.
Configuring user settings involves the following steps:
1. Navigate to “Setup,” then “Users,” and select the specific user ID to be assigned.
2. Access the “Organization” tab.
3. In the “Row Level Permissions” section, input the permission code “REP – Representative.”
4. Specify the Sales Rep code assigned to the user in the “Key” field.
These steps ensure that the user is appropriately associated with the designated Sales Representative role, enabling access to relevant data and functionalities based on their assigned permissions.

Linking a Sales Rep to a User involves the following steps:
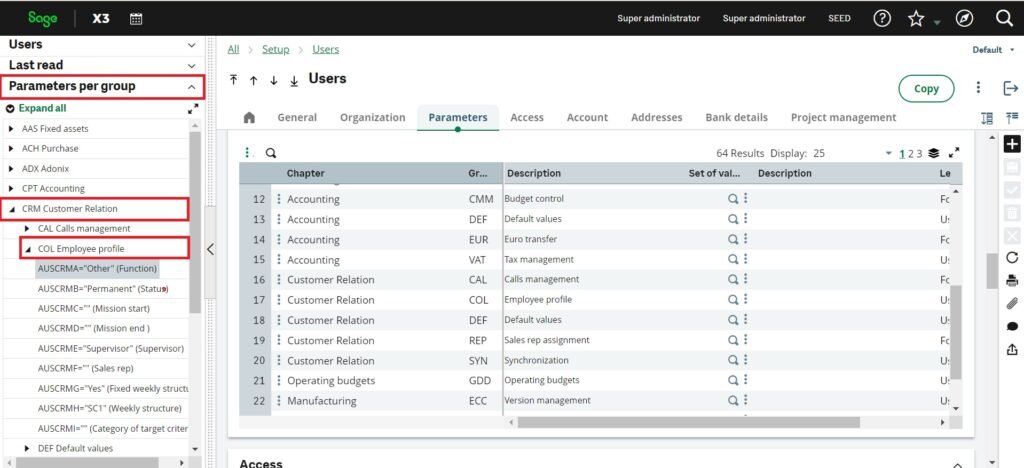
1. Access the user entry screen and navigate to “Parameters Per Group” in the left-hand navigation menu.
2. Choose “CRM Customer Relations.”
3. Select “COL Employee Profile” and click on the first parameter to access the detailed settings for Sales Rep Access, specifically for Sage X3.
This process ensures that the user is properly associated with the Sales Rep profile, allowing them to access relevant information and functionalities within the CRM system, particularly related to Sage X3.
Assign Parameters:
Assigning parameters involves defining specific details within the parameter chapter to link a user with a sales rep in Sage X3. These details facilitate the integration and functionality between the user and the created sales rep business partner. The key parameters to define include:
1. Function: Specifies the role or function of the user, such as “Sales Engineer.”
2. Mission Start Date: Indicates the date of the user’s hire or assignment start date.
3. Sales Rep Number: Refers to the unique Sales Rep ID created in the sales rep function within the common data module.
4. Weekly Structure: Defines the weekly work schedule, such as SC1 representing 5 days of work, with 8 hours per day.
By accurately defining these parameters, the linkage between users and sales reps is established, enabling seamless operations and data management within Sage X3.

Row level permissions can function independently without being directly linked to a sales rep ID code. However, by associating the user ID with a specific sales rep, the user’s actions become tied to that sales representative. This linkage allows the user to leverage Sage X3 enhancements tailored specifically for the sales team. By connecting user activities to sales reps, organizations can better manage and track sales-related processes, enabling more effective sales operations within Sage X3.
In the competitive world of sales, access to real-time sales data and precise control over account access are paramount. Sage X3 offers a user-friendly solution, allowing effective management of user access while ensuring sales reps can efficiently handle transactions. This article provides a step-by-step guide to configuring sales rep profiles and linking them to specific X3 user IDs, streamlining user management within the system.
