While there are tons of documentation highlighting about platform events and their use cases there are even trailhead modules, recently we came up with the question that how should someone be able to tell a Salesforce rookie what a platform event is? Yes, it’s a platform-based notification system which can help orchestrate a proper integration routine but explaining this to someone who has just begun his/her coding is a bit harsh. So, what’s platform event in basic terms and how is it helpful to me?
Consider this, a platform event is just like another custom object but this would only be referred by external systems to communicate with Salesforce. To put this in a scenario when a certain system posts data on a Salesforce endpoint then that data should be fetched and the data in Salesforce should be updated. Of course, you can use too many lines of code to continuously fetch and retrieve the data from the endpoint or just wait for data to be posted based on which an event shall be triggered and the next processes shall follow. Now, this is where platform event comes into the picture, instead of writing lines and lines of codes and continuously requesting and checking if the data is posted we can just have a platform event trigger notify us and then have your logic do the rest of the heavy lifting.
Now, that we have convinced you why Platform events are good, let’s give you a quick walkthrough of it. From your Setup, in quick find box search for “Platform Events” then click on “New Platform Event” then just like your Custom Object enter the label and API name for your Platform Event. Once completed then add any Custom Fields you want. Now, for demo purpose we will be naming our platform event as “Demo Event” and we will be adding two fields to it named Account Number and Account Name.
Note- Platform event end with “__e” instead of “__c” notifying that they are platform event and differing from custom object.
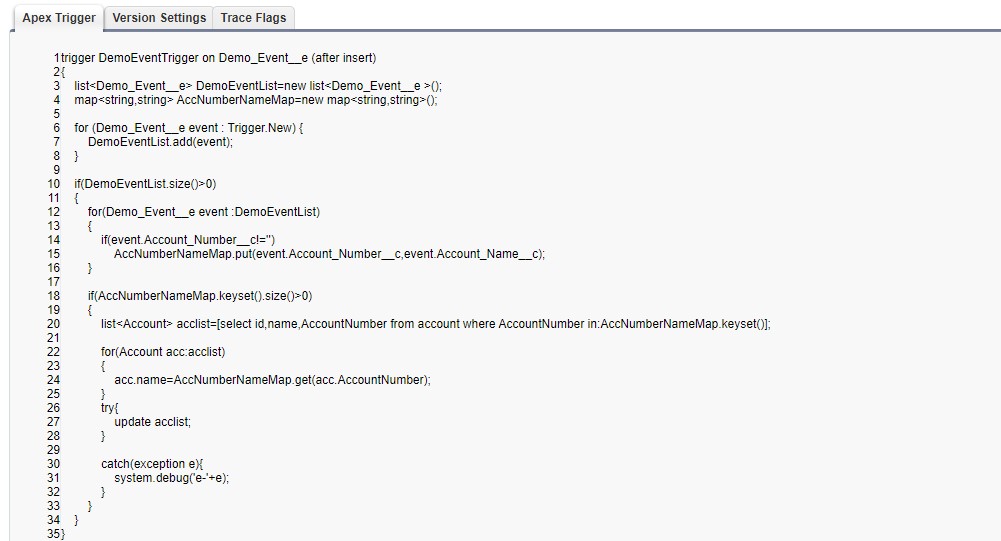
Once you are satisfied with you Platform Event and your fields click on “New” trigger for your platform event, then add the below code.
Now, log into Workbench then under Utilities section click on “Rest Explorer”, now, in your execute section after your version number just append “/sobjects//” e.g.-”/services/data/v42.0/sobjects/Demo_Event__e/” and in request body just add the below JSON and click on execute, once the request is processed your record will be updated.
About Us
Greytrix is one stop solution provider for Sage ERP and Sage CRM needs. We provide complete end-to-end assistance for your technical consultations, product customization’s, data migration, system integrations, third-party add-on development and implementation expertise.
Greytrix has some unique solutions for Cloud CRM such as Salesforce integration with Sage X3, Sage 100 and Sage 300. We also offer best-in-class Cloud CRM Salesforce customization and development services to business partners and end users. Greytrix has some unique solutions for On-Premise CRM such as Sage CRM integration with Sage X3, Sage 100, Sage 300, Sage Intacct and Sage 50. We also offer best-in-class On-Premise Sage CRM customization and development services to business partners and end users.
For more information, please contact us at salesforce@greytrix.com. We will be glad to assist you.
Related Posts


