In this blog, we will explore the process of how to seamlessly integrate Salesforce CPQ with Adobe Acrobat Sign.
Prerequisites
- Salesforce CPQ: Make sure to have Salesforce CPQ installed and activated within your Salesforce organization.
- Adobe Acrobat Sign: You’ll require an active Adobe Sign account with the suitable licensing plan.
- Adobe Sign Salesforce CPQ Connector: This connector streamlines the integration between both platforms. Install it from the Salesforce AppExchange.
Before installing the Adobe Acrobat Sign for Salesforce package, it’s important to coordinate with the Acrobat Sign support team to ensure the following:
- The Adobe Acrobat Sign account is accurately set up within the Salesforce channel.
- An authorized user ID (email address) is specified as an administrator in the Acrobat Sign system.
- All conceivable user domains (those utilized in email addresses) are incorporated, excluding public domains such as gmail.com or yahoo.com.
- Keep a record of all users within the Adobe Acrobat Sign system linked to your owned domains. You might need to request valid users to be migrated into your Adobe Acrobat Sign account.
- Verify that user email addresses in Adobe Acrobat Sign correspond to their primary email addresses. Else, you must change the Adobe Acrobat Sign email value
To successfully install and utilize Adobe Acrobat Sign for Salesforce, consider the following Salesforce environment settings:
- Turn off any pop-up blockers when installing and configuring.
- Activate cookies in your browser.
- Enable third-party cookies, as some browsers may require.
- In Salesforce Setup, go to Settings > Security > Session Settings, and ensure that the option “Lock sessions to the IP address from which they originated” is turned off.
- Allocate valid licenses to users and administrators of Adobe Acrobat Sign.
- Review the limits for file uploads. Salesforce Lightning restricts file uploads to around 700 KB. Configure Salesforce to send documents from the library in the background, up to 9 MB. Refer to the instructions for configuring Acrobat Sign for Salesforce when sending large documents.
Integrate Salesforce CPQ with Adobe Acrobat Sign
After installing the mentioned packages, let’s move ahead to configure the required settings in your Salesforce organization to integrate Salesforce CPQ with Adobe Acrobat Sign.
- Navigate to the App Launcher and search for “Adobe Acrobat Sign for Salesforce”.
- Select the “Adobe Acrobat Sign for Salesforce” app.
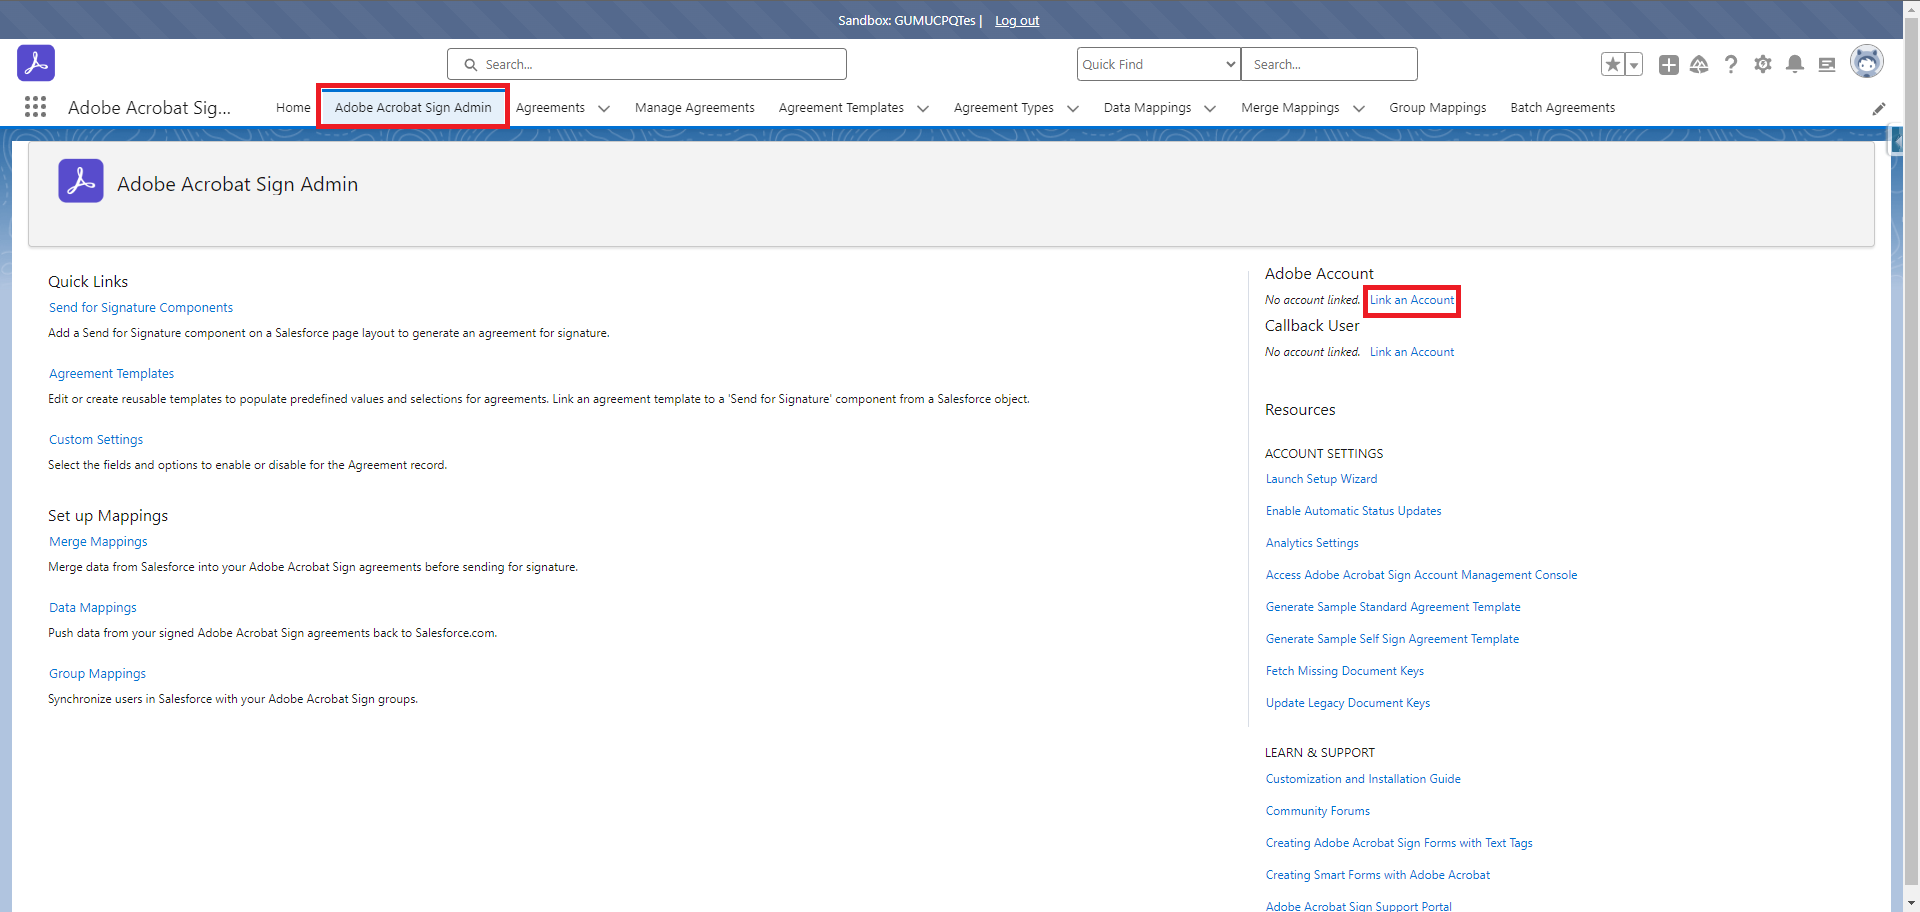
- Once the app is loaded, click on the “Adobe Acrobat Sign Admin” tab.
- Within that app, on the right-hand side, locate the section labeled “Adobe Account”. Click on “Link an Account” within that section.
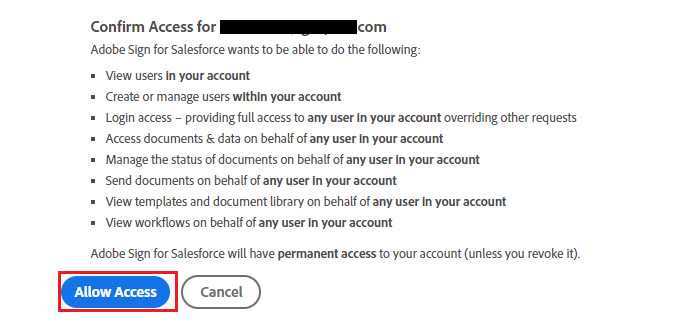
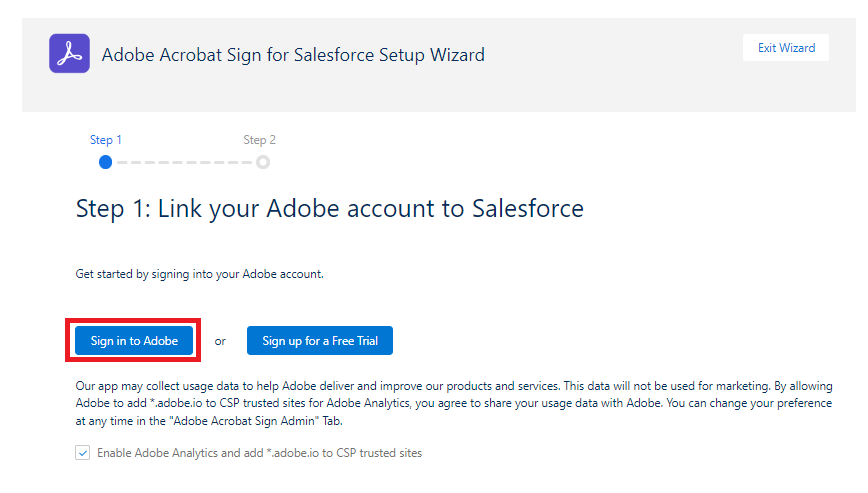
- After clicking, you’ll be directed to the “Adobe Acrobat Sign for Salesforce Setup Wizard” page. From there, proceed by clicking the “Sign in to Adobe” button. Next, click on the Allow Access button.
- Upon clicking, the “Adobe Acrobat Sign” login page will appear and can be used to integrate Salesforce CPQ with Adobe Acrobat Sign. Enter your Acrobat username and password.

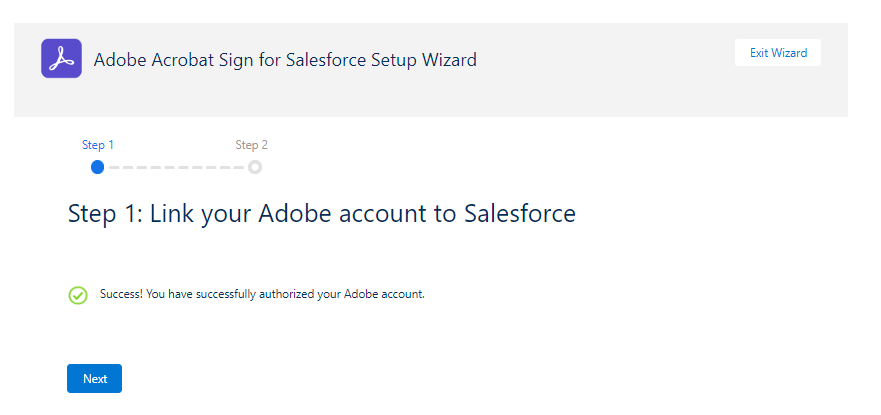
- After successfully authorizing, you will be redirected to a new page to integrate Salesforce CPQ with Adobe Acrobat Sign. Click on the “Next” button to proceed.
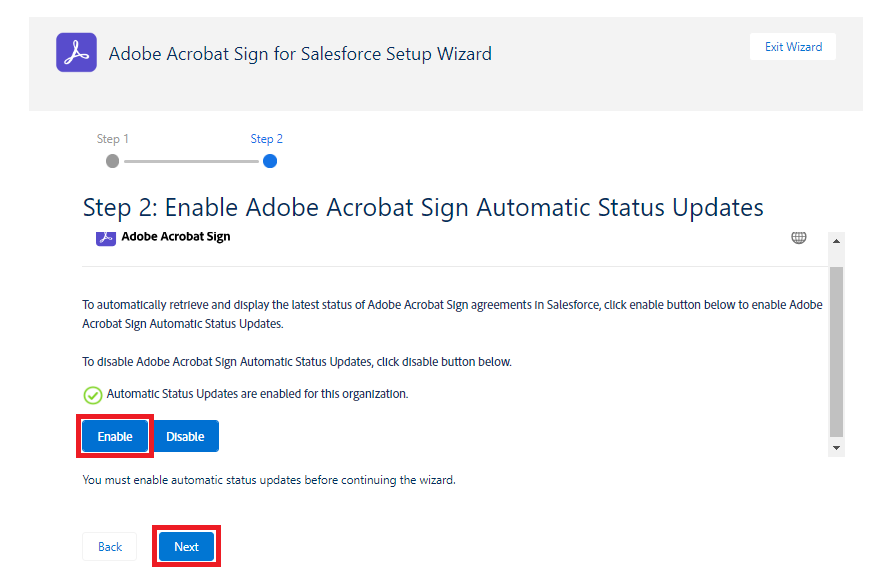
- After clicking, select the “Enable” button to show the latest status of agreements sent from Salesforce. A pop-up window will appear where you should click “Allow” to grant permissions. Then, proceed by clicking the “Next” button.
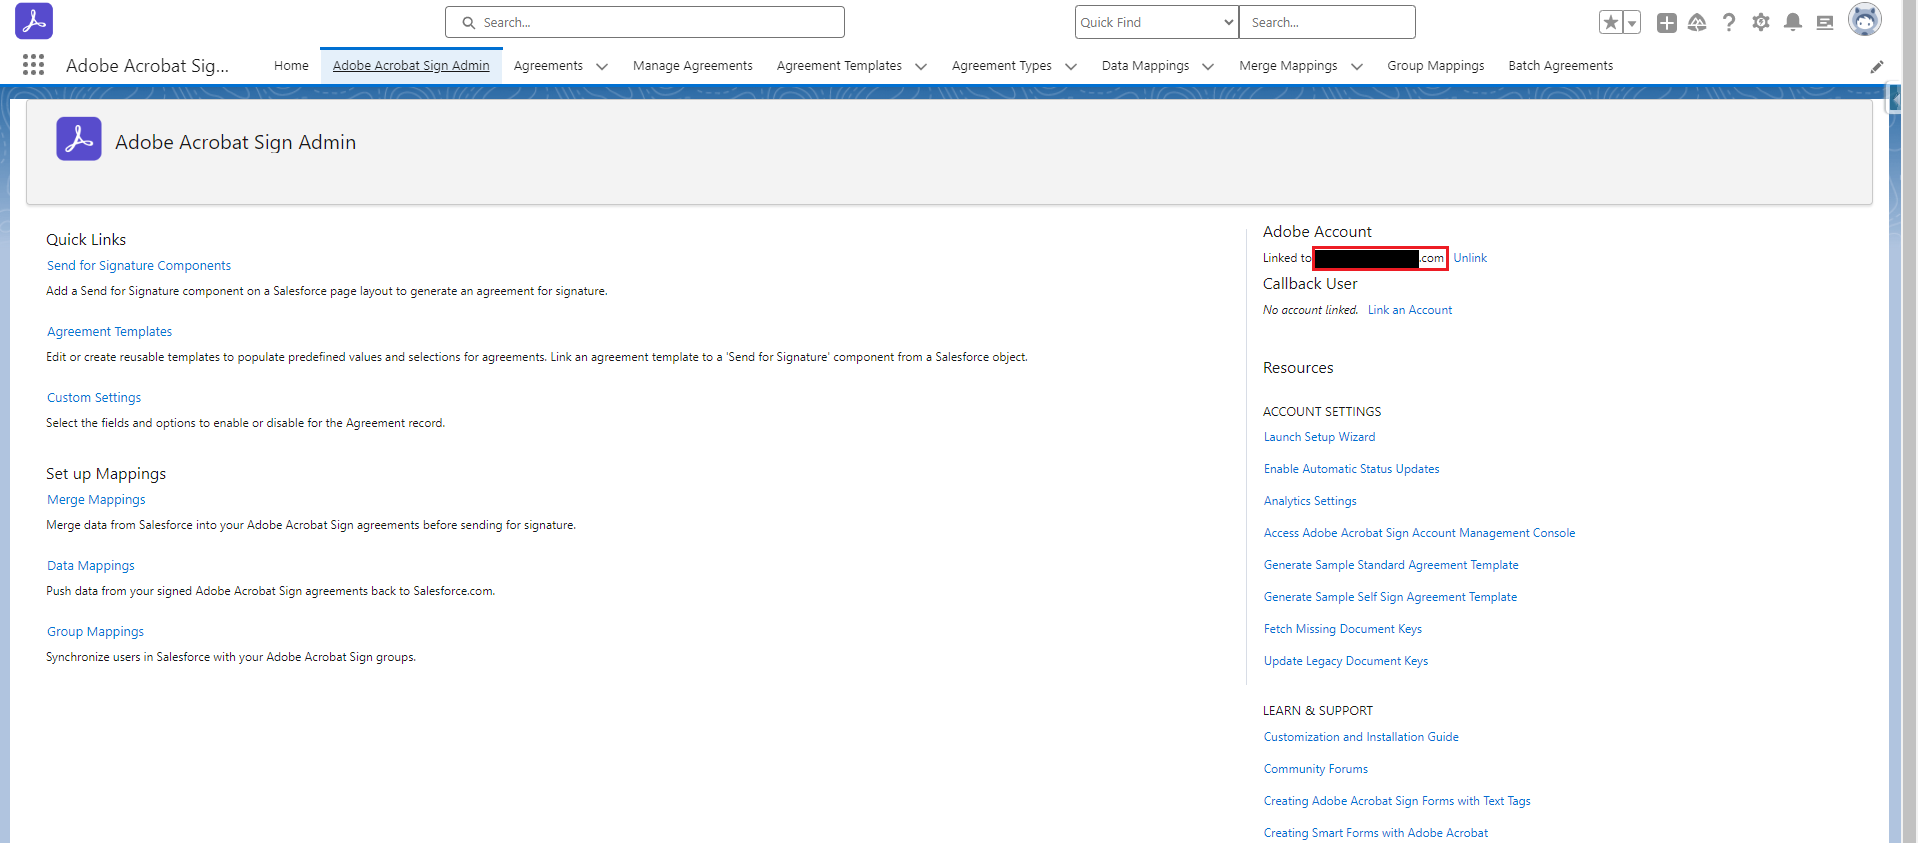
- After completing the setup, you will be directed back to the “Adobe Acrobat Sign Admin” tab, where you can see the link between Acrobat Sign and Salesforce and integrate Salesforce CPQ with Adobe Acrobat Sign.
By following the above blog instructions, you will be able to learn “How to integrate Salesforce CPQ with Adobe Acrobat Sign.”
More details about the product are available on our website and Salesforce AppExchange.
We hope you may find this blog resourceful and helpful. However, if you still have concerns and need more help, please contact us at salesforce@greytrix.com.
About Us
Greytrix – a globally recognized and one of the oldest Sage Development Partner and a Salesforce Product development partner offers a wide variety of integration products and services to the end users as well as to the Partners and Sage PSG across the globe. We offer Consultation, Configuration, Training and support services in out-of-the-box functionality as well as customizations to incorporate custom business rules and functionalities that require apex code incorporation into the Salesforce platform.
Greytrix has some unique solutions for Cloud CRM such as Salesforce Sage integration for Sage X3, Sage 100 and Sage 300 (Sage Accpac). We also offer best-in-class Cloud CRM Salesforce customization and development services along with services such as Salesforce Data Migration, Integrated App development, Custom App development and Technical Support business partners and end users.
Salesforce Cloud CRM integration offered by Greytrix works with Lightning web components and supports standard opportunity workflow. Greytrix GUMU™ integration for Sage ERP – Salesforce is a 5-star rated app listed on Salesforce AppExchange.
The GUMU™ Cloud framework by Greytrix forms the backbone of cloud integrations that are managed in real-time for processing and execution of application programs at the click of a button.
For more information on our Salesforce products and services, contact us at salesforce@greytrix.com. We will be glad to assist you.
Related Posts

