Salesforce Sales Cloud’s Territory Management enables businesses to create and manage territory models based on geographic locations or industry-specific criteria. This feature allows companies to efficiently assign accounts, opportunities, cases, and leads to the appropriate teams, optimizing resource allocation. Additionally, it facilitates seamless connections between territory models and account, lead, and user assignments while providing tools to track and analyze performance across territories.
Let’s Start the process of creating and managing sales territory in Salesforce:
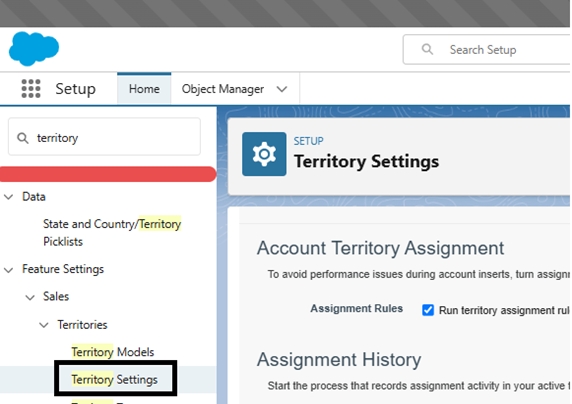
- From Setup, enter Territories in the Quick Find box, and then select Territory Settings.
- Click Enable Sales Territories and Save your Settings, the following screen will appear.
- Creating Territory Types: Let’s start by categorizing and defining individual territories. Creating territory types is the first step in setting up your territory model in Salesforce.
- From Setup, enter and select Territory Types in the Quick Find box.
- Click on the New Territory Type button.
- Enter a label and a description. In your description, make sure that you clearly indicate what kinds of territories belong to that type.
- Specify a territory type priority.
- Click Save.

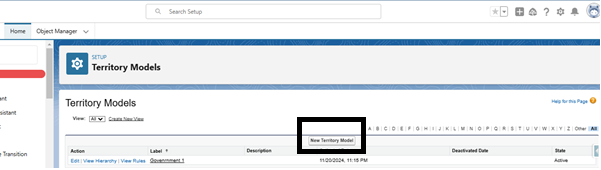
- Creating Territory Models: Connect territories to account, lead, and user assignments.
- From Setup, enter and select Territory Models in the Quick Find box.
- Click the New Territory Model button.
- Define the label and description fields.
- Click Save.
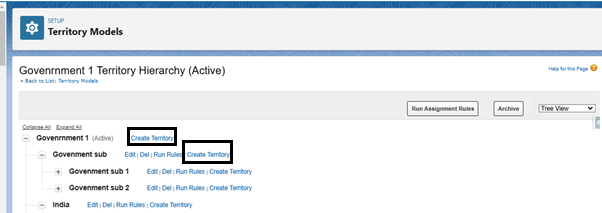
- Creating Territories: Build your company’s territory model when you create territories that appear on the model’s hierarchy in Sales Territories.
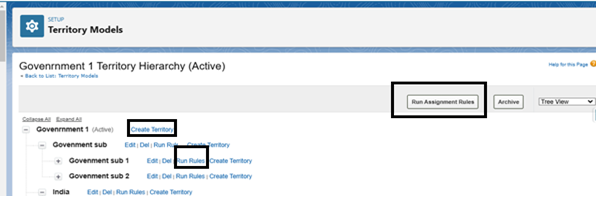
- On the Territory Models page in Setup, click View Hierarchy next to the territory model where you want to create the territory.
- To create a top-level territory, hover over the territory model name and select Create Territory. To add a child territory under an existing territory, hover over the territory name and click Create Territory.
- On the New Territory page, define the territory: give it a meaningful label, and choose its territory type.
- After building your territory hierarchy, select the required territory to set assignment rules and assign users to it. You can do this for each territory individually.
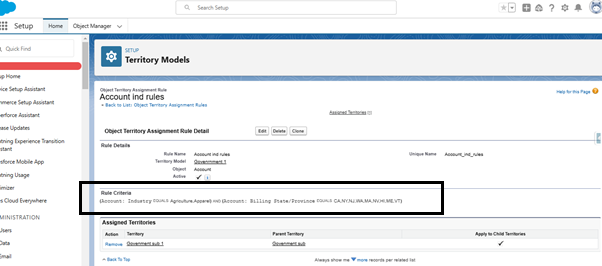
- Click on the child territory “Government sub 1”. Create Rules to Assign Accounts to Territories: Automate assignments of new and updated accounts to territories using rules that you create and run.
- Rules help define what type of accounts belong to a territory. They tell Salesforce to automatically assign accounts with matching details, like location or industry, to the right territory.
- Accounts are assigned to territories based on these rules during account creation or updates, but only if the territory model is in the Active state.
- Now will give the assignment rule to see working. Scroll down into the territory section and Under the Assigned rules Assigned to This Territory and click on New button.
- Create a New rule to assign to the territories, according to the requirement, and click on save the changes.
- Now let’s assign the users to the territory for the customer records. Click on the “Manage Users” Button and click on Save.

- Assigning Accounts to the territories:
- Automatic Assignment – Using the assignment rule accounts are assigned based on the criteria in the account fields when created/edited the rule will be evaluated and assigned.
- Now let’s run the assignment rules we recently created. For example, since we created an assignment rule and added a user for the child territory ‘Government sub 1’, we will run the rule specifically for this territory.
- Note: The “Run Assignment Rules” button will apply to all accounts that match the rule criteria.
- Click Run Rules to check the conditions met while creating an account. If they are, the territory will be assigned to that account in Salesforce.
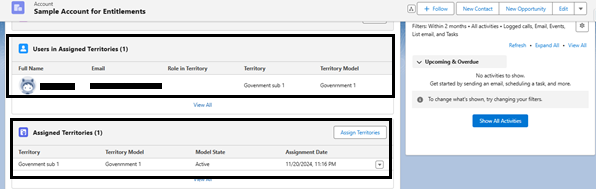
- Create a test account and add your details. For testing purposes, simply add the billing state and industry to meet the condition
- You will be able to see the specific “Assigned Territories” and “Users in Assigned Territories” listed in the account’s related list.
- To test this Now Login with your assigned user and the assigned territory will be shared the record’s based on the territory record access configuration. And this user will able to access the particular account.
- Now, users of this territory model will be able to access the record even though the account sharing rule is private. Additionally, this account record belongs to the territory “Government sub 1”.
By following the above blog instructions, you will be able to learn about “Salesforce Sales Cloud’s Territory Management”. If you still have queries or any related problems, don’t hesitate to contact us at salesforce@greytrix.com. More details about the Product are available on our website and Salesforce AppExchange. We hope you may find this blog resourceful and helpful. However, if you still have concerns and need more help, please contact us at salesforce@greytrix.com.
About Us
Greytrix – a globally recognized and one of the oldest Sage Development Partner and a Salesforce Product development partner offers a wide variety of integration products and services to the end users as well as to the Partners and Sage PSG across the globe. We offer Consultation, Configuration, Training and support services in out-of-the-box functionality as well as customizations to incorporate custom business rules and functionalities that require apex code incorporation into the Salesforce platform.
Greytrix has some unique solutions for Cloud CRM such as Salesforce Sage integration for Sage X3, Sage 100 and Sage 300 (Sage Accpac). We also offer best-in-class Cloud CRM Salesforce customization and development services along with services such as Salesforce Data Migration, Integrated App development, Custom App development and Technical Support business partners and end users.
Salesforce Cloud CRM integration offered by Greytrix works with Lightning web components and supports standard opportunity workflow. Greytrix GUMU™ integration for Sage ERP – Salesforce is a 5-star rated app listed on Salesforce AppExchange.
The GUMU™ Cloud framework by Greytrix forms the backbone of cloud integrations that are managed in real-time for processing and execution of application programs at the click of a button.
For more information on our Salesforce products and services, contact us at salesforce@greytrix.com. We will be glad to assist you.
Related Posts
- Salesforce Reports: Reseller Relationships and Common Product History.
- How Salesforce Education Cloud Modernizes Alumni Engagement.
- Creating Dynamic Agreement Templates in Adobe Acrobat Sign for Salesforce with Screen Flows.
- Never miss a Lead Update: Leveraging Salesforce Flow Automation for Email Alerts.
