In our previous blog, Migrating Salesforce metadata using Changesets, we discussed various methods of Salesforce metadata migration and elaborated upon deployment using changesets.
In this blog we will discuss another tool used for metadata migration in Salesforce i.e. Force.com IDE.
Force.com IDE:
The Force.com IDE is a plugin that sits on top of Eclipse framework (it is an open source tool that is used for ease of development), and it has its own release cycle, controlled by Salesforce.com.
Prerequisites:
- Java SE Runtime Environment 5 (v1.5) or later
- Eclipse with Force.com IDE plugin installed.
The Force.com IDE is an integrated development environment for developing applications on the Force.com platform using Apex, Visualforce, and metadata components. It is designed for developers and development teams.
The Force.com IDE is built on top of the open-source Eclipse platform, and is available as a plug-in. The Force.com platform enables project-based development by using text-based files to represent the various components in a Salesforce organization. These files are easily transported, can be stored and versioned in a source control system.
Creating new project using Force.com IDE:
Steps:
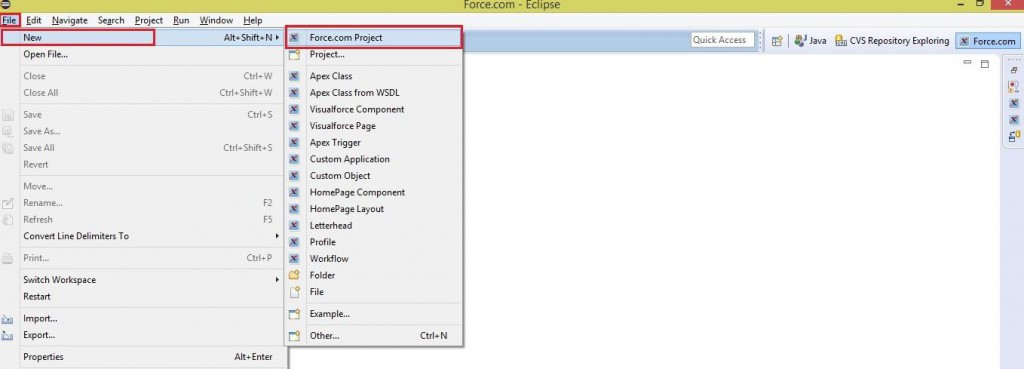
- Open Eclipse. Go to File >> Click New >> Select Force.com Project.

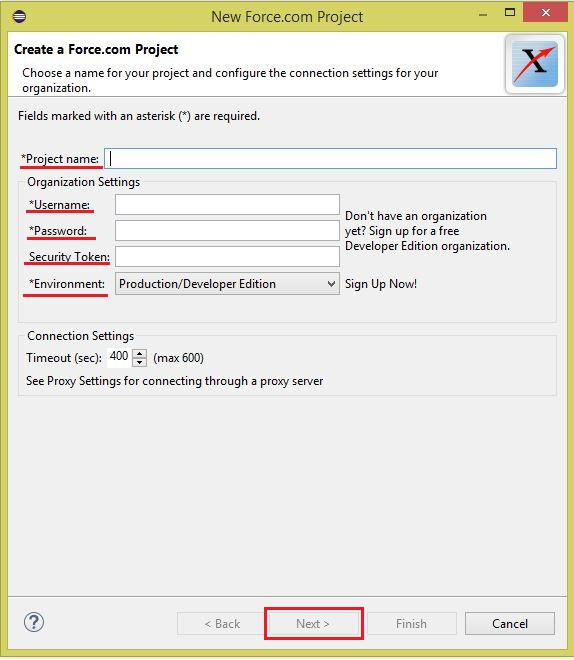
- Enter the following details –
Project Name – Name of project.
Username- Salesforce Username
Password- Salesforce password
Security Token –Salesforce Org token
Environment- Salesforce environment i.e. Production/Developer org or Sandbox org.
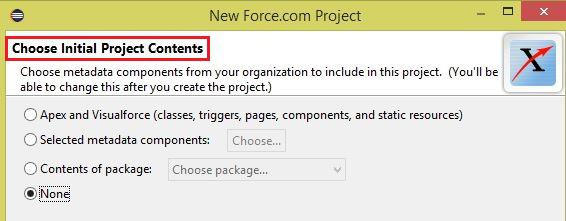
- Once the authentication is successful, select metadata components to be downloaded in eclipse. It provides four different options. Select any one of them and click ‘Finish’.

Now Force.com project gets created in eclipse successfully.
Benefits of Force.com IDE:
- It provides a comfortable environment for programmers, allowing to code, compile, test, package and deploy all from within the IDE itself.
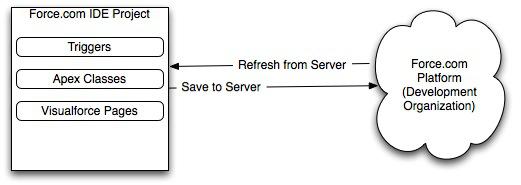
- It provides a way to keep Salesforce Org and Force.com project in sync with each other by providing the following options.
Right Click Project Name => Refresh from Server
Right Click Project Name => Save to Server
- It provides both options of working i.e. Online or Offline project.
Thus, we have discussed creating project using Force.com IDE in Salesforce. In our next blog, we will discuss deploying project in Salesforce Org using Force.com IDE.
About Us
Greytrix – a globally recognized Premier Sage Gold Development Partner is a one-stop solution provider for Sage ERP and Sage CRM needs. Being recognized and rewarded for multi-man years of experience, we bring complete end-to-end assistance for your technical consultations, product customizations, data migration, system integrations, third-party add-on development and implementation expertise.
Greytrix caters to a wide range of Sage Enterprise Management (Sage X3) offerings – a Sage Business Cloud Solution. Our unique GUMU™ integrations include Sage Enterprise Management (Sage X3) for Sage CRM, Salesforce.com and Magento eCommerce along with Implementation and Technical Support worldwide for Sage Enterprise Management (Sage X3). Currently we are Sage Enterprise Management Implementation Partner in East Africa, Middles East, Australia, Asia. We also offer best-in-class Sage X3 customization and development services, integrated applications such as POS | WMS | Payment Gateway | Shipping System | Business Intelligence | eCommerce and have developed add-ons such as Catch – Weight and Letter of Credit for Sage Enterprise Management to Sage business partners, end users and Sage PSG worldwide.
Greytrix is a recognized Sage Rockstar ISV Partner for GUMU™ Sage Enterprise Management – Sage CRM integration also listed on Sage Marketplace; GUMU™ integration for Sage Enterprise Management – Salesforce is a 5-star app listed on Salesforce AppExchange.
For more information on Sage X3 Integration and Services, please contact us at x3@greytrix.com. We will be glad to assist you.
Related Posts


