In our previous blog “Using Force.com Migration Tool Part I – Configuration”, we discussed about setting up environment for using Ant tool. In this blog we will discuss about how to use Ant based Force.com Migration tool for metadata migration.
Real-time, bi-directional, multi-company – Sage ERP Integration with Salesforce
Steps for Metadata migration using Ant Force.com Migration tool –
-
Preparing build: Preparing build for your project needs 3 files as follows.
- Build.xml
- Build.properties
- Package.xml
- Create new folder for storing your project migration Data.
- Copy ‘build.xml’ & ‘build.properties’ files from unzipped in step 2. i.e. salesforce_ant_33.0\sample & paste it into project folder (created in previous step).
- Edit ‘build.xml’ & ‘build.properties’ as below:
- build.xml:
Specify the actions/operations that you want to perform (either retrieve or deploy or any other possible operation). These are also called as targets. So, you can run these targets one by one and complete the task in sequential manner. Every target has given a name which is used for calling targets from command prompt.
This file refers build.properties file where you have mentioned all the required details like username, password, and serverurl.
E.g.
- Retrieving the Package contents from Source Salesforce Org into directory
<target name=”<Command name (User defined)>“>
<mkdir dir=”< folder to be created to store retrieved data>“/>
<sf: retrieve username=”${sf.username}” password=”${sf.password}” serverurl=”${sf.serverurl}” maxPoll=”${sf.maxPoll}” retrieveTarget=”<folder specified in mkdir>” packageNames=”<your package name>“/>
</target>
- Deploying the Package contents into Target Salesforce Org
<target name=”<Command name (User defined)>“>
<sf: deploy username=”${sf.username}” password=”${sf.password}” serverurl=”${sf.serverurl}” maxPoll=”${sf.maxPoll}” deployRoot=”<Path of folder which is to be deployed>” rollbackOnError=”true”/>
</target>
- build.properties:
Specify the login credentials for the desired Salesforce organization on which you want to perform the operation (deploy or retrieve)
sf.username = <Insert your Salesforce username here>
sf.password = <Insert your Salesforce password along with security token here>
sf.serverurl = https://login.salesforce.com
sf.maxPoll = 20
(Note: All contents displayed above in blue color are need to be customized/defined by user.)
- package.xml:
This file is created in Force.com IDE (explained in Step 7).
It contains information of metadata components to be migrated in xml format.
- Sequence of Metadata Migration
- Logical steps for Data Migration are:
– Retrieve Metadata from Source Salesforce Org using ant-retrieve command.
– Retrieved data is stored in a folder specified in ant command.
– Stored metadata is gets deployed in Target Salesforce Org using ant-deploy command.
- Detailed steps to migrate metadata from one Salesforce org to another:
– Open Force.com IDE
– Create new Force.com Project for the source Salesforce Org as follows:
- Open Eclipse & Change its Perspective to ‘Force.com’
- Click on File -> New -> Force.com Project
- Specify all credentials of Source Salesforce Org, Click Next.
- Choose desired Components to be migrated i.e. Package, VF pages & Classes or all components.
- Click Finish
- Now Project has been created in IDE. Expand it & in source directory, you will find package.xml file.
- Create new folder for storing metadata & copy above package.xml file in it.
- Also copy build.xml & build.properties files in newly created folder. Edit them as specified in step 6.
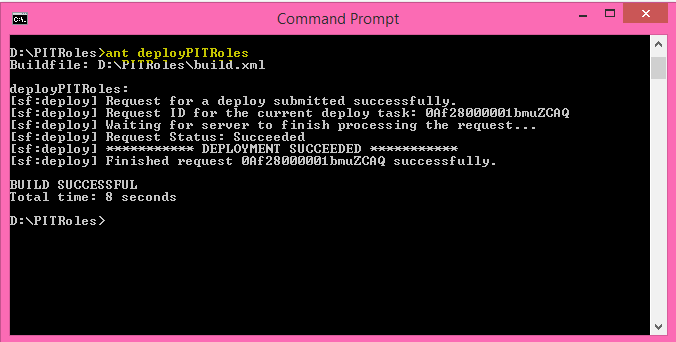
- Open Command Prompt
- Run the ant commands
- Running Ant Commands
Ant Command to run above script is:
ant <target name specified by user>
Thus, we have discussed deploying project/metadata in Salesforce Org using Ant based Force.com Migration tool.
About Us
Greytrix as a Salesforce Product development partner offers a wide variety of integration products and services to the end users as well as to the Partners across the globe. We offer Consultation, Configuration, Training and support services in out-of-the-box functionality as well as customizations to incorporate custom business rules and functionalities that require apex code incorporation into the Salesforce platform.
Greytrix has some unique solutions for Cloud CRM such as Salesforce integration with Sage Enterprise Management (Sage X3), Sage Intacct, Sage 100 and Sage 300 (Sage Accpac). We also offer best-in-class Cloud CRM Salesforce customization and development services along with services such as Salesforce Data Migration, Integrated App development, Custom App development and Technical Support to business partners and end users.
Greytrix GUMU™ integration for Sage ERP – Salesforce is a 5-star app listed on Salesforce AppExchange.
For more information, please contact us at salesforce@greytrix.com. We will be glad to assist you.
Related Posts

